The Mechanics of Rolling Resistance
We put a lot of emphasis on tire selection because tires are probably the single component that can make the biggest difference to your bike's performance.
While rolling resistance generally accounts for a smaller share of total resistance than aerodynamic drag, the differences resulting from tire choice and tire pressure can often be greater than those achieved through aerodynamic optimization.
Internal Losses
Internal losses, often described as internal friction, are usually what people think of first when hearing about rolling resistance.
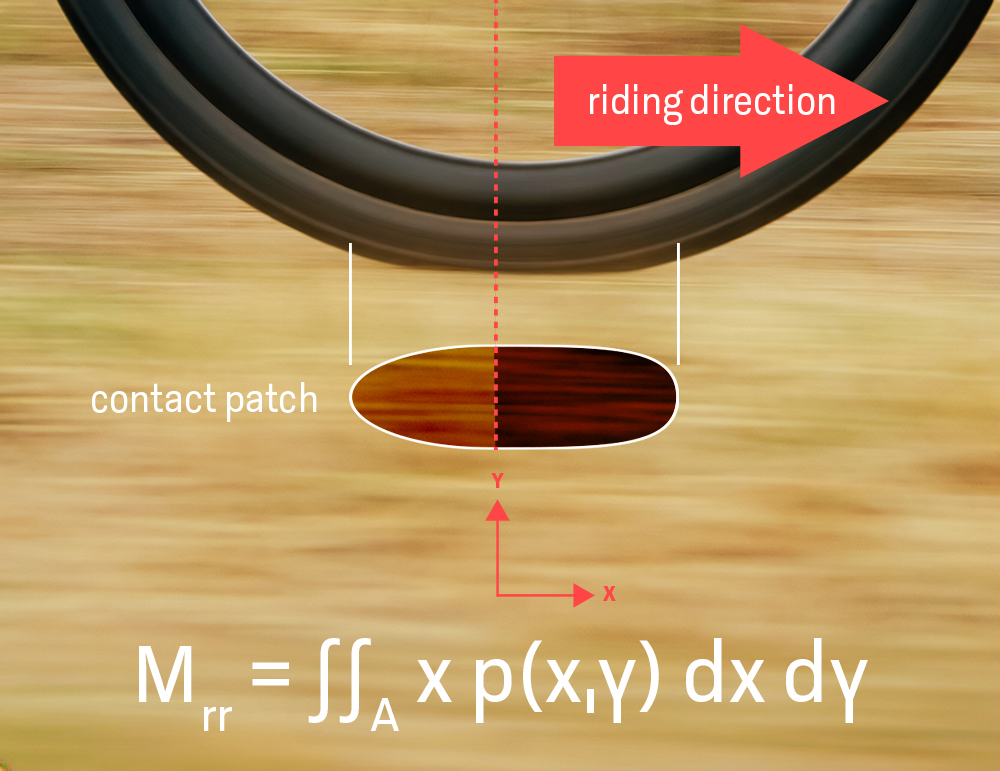
If we look at the contact patch of a tire, the tire gets compressed as it enters the front of the contact patch and expands again as it leaves at the rear. However, during this deformation cycle, some of the energy is converted into heat. As a result, the tire does not recover the same amount of energy during expansion as was required to compress it.
This also affects how pressure is distributed within the contact patch. While we might expect the pressure distribution to be symmetric around the wheel axis, this is not the case when the tire is rolling. Due to the hysteresis of the tire material, the pressure is generally higher towards the front of the contact patch than towards the rear.
If we integrate the pressure over the entire contact patch, we get the total vertical force supporting the wheel. Because the centre of this force is shifted forward relative to the wheel axis, it creates a torque that opposes the rotation of the wheel.
This resisting torque is how the internal energy losses of the tire manifest themselves as rolling resistance.
These losses are commonly measured using drum tests, a method that has been used in tire testing for decades. For a long time, drum testing dominated how rolling resistance was evaluated and discussed in cycling. Since higher inflation pressures generally reduce tire deformation and the associated energy losses on smooth surfaces, higher pressures became synonymous with lower rolling resistance.
Surface Irregularities
Once you ride over anything that is not a perfectly smooth surface, additional losses occur.
When your wheel hits an irregularity in the surface, a force acts on the wheel that is directed mainly upwards, but also slightly against your riding direction. If you are riding very slowly, a similar force acts on the way down from the irregularity, but now with a forward component. In this case, much of the energy required to lift the wheel can be recovered as it descends.
However, at typical riding speeds, the force on the way down can be much smaller than the force when hitting the obstacle. The mass of the bicycle and rider needs to be accelerated upwards when encountering an irregularity, increasing the contact force. As the wheel moves down again, inertia can reduce the contact force. In an extreme case, the wheel loses contact with the surface entirely, so the force on the way down is zero before the wheel hits the ground again.
You can also think about this using our contact patch model discussed above. When the wheel hits an irregularity, we get a high spike in pressure towards the front of the wheel axis, creating a resisting torque. If this is not balanced by a corresponding forward-acting torque as the wheel moves past the irregularity, energy is transferred from the forward motion of the bicycle into vertical movement and vibrations.
Additionally, the force acting on the wheel is no longer purely vertical. When the wheel encounters an obstacle, the contact force also has a horizontal component acting against the riding direction. This contributes directly to the resistance the bicycle experiences, independently of whether the force produces a torque around the wheel axle.
Riding over rough pavement, cobblestones, or gravel repeats this process at a high frequency, creating what we experience as vibrations. Much of the energy transferred through these small but frequent impacts eventually gets dissipated as heat in the rider's body, the bicycle, and its components.
Increasing tire volume and reducing tire pressure allows the tire to absorb more of these surface irregularities, reducing the vibrations transmitted to the bicycle and rider.
This helps explain why tires have become wider in recent years, and why the optimal tire pressure is a balance between minimizing internal losses in the tire and reducing the energy lost through vibrations.
Ground Deformation
The third component of rolling resistance, which gets surprisingly little attention, is ground deformation.
If you leave a permanent tire track, you've clearly put energy into deforming the ground. Anyone who has ever ridden through deep sand or a soggy field has experienced just how much resistance this can create.
Again, we can use our contact patch model to understand what happens. As the tire rolls forward, it pushes material out of its way and compresses the ground beneath it. This increases the forces acting on the front of the tire, shifting the resultant contact force forward relative to the wheel axis and creating a larger resisting torque. At the same time, the inclined contact forces have a horizontal component acting directly against our riding direction.
Unlike the deformation of the tire itself, which is largely reversible apart from its internal hysteresis losses, deformation of soft or loose ground can require substantial energy that is not recovered as the wheel passes.
By lowering tire pressure and using larger tires, both in width and diameter, we can distribute the load over a larger area, reduce how deeply the tire sinks into the ground, and therefore reduce rolling resistance.
Testing
Drum testing is one of the most precise and repeatable ways to compare tires. Bicycle Rolling Resistance publishes drum test results for a wide range of tires, making it an excellent resource. If you ride mainly on smooth tarmac, choosing your tire setup based on these results is a very reasonable approach.
However, drum testing comes with an important limitation: it primarily measures internal losses in the tire, rather than the additional losses caused by vibrations or ground deformation. As long as you're comparing tires of similar width and diameter, drum testing can still give you a good indication of which tire is faster, even outside the laboratory.
If you want to include all forms of rolling resistance in your testing, there are two practical approaches: timed laps or sectors, and Virtual Elevation.
The setup for timed laps or sectors is very simple: choose a route, ride at a constant power, and measure the time. However, executing this consistently is far from easy. Maintaining exactly the same power over multiple runs is challenging, and even small changes in wind conditions can influence the results without you noticing.
Testing using the Virtual Elevation method is a little more involved. You need additional equipment, such as an accurate speed sensor and scales to determine the total system weight, as well as suitable software.
The main advantage is that you don't need to maintain a constant power or pace. Instead, Virtual Elevation uses recorded power and speed data to reconstruct an elevation profile based on a mathematical model of the forces acting on the bicycle.
If external influences such as wind or changes in riding position affect the results, they can often be identified through inconsistencies between repeated runs. This makes it easier to recognize and exclude compromised measurements, although it cannot eliminate every source of error.
These are the main reasons why we use Virtual Elevation for our own testing. It isn't perfect, but so far, it's the best practical method we've found for comparing equipment under real-world riding conditions.